Repository for Alpha and Beta testing of Systemcore and Motioncore devices
Note that all updated documentation for 2027 WPILib changes, new features, etc. can be found on the '2027' version of the WPILib Docs site: https://docs.wpilib.org/en/2027/.
Software posted here is Alpha software for the 2027 season and is not compatible with Control Hub or roboRIO
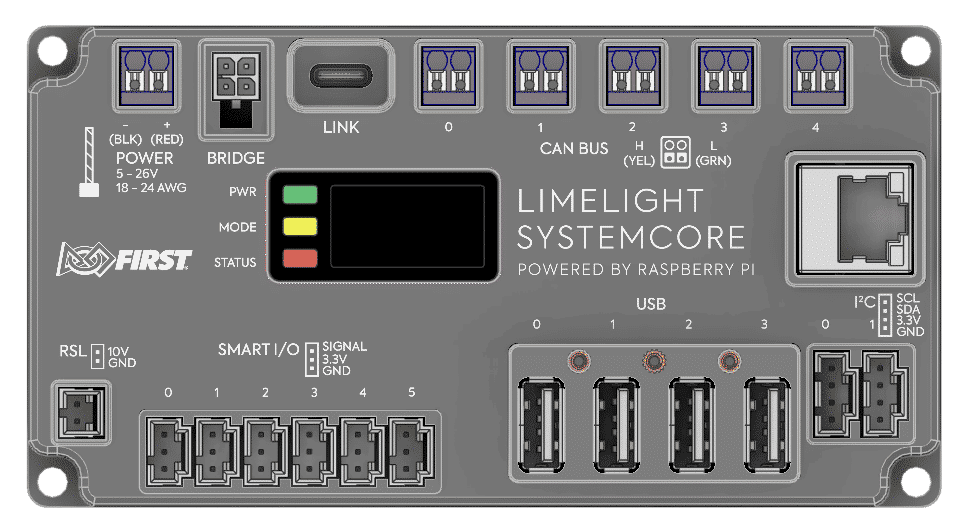
Alpha units do not have port labels

Limelight Hardware Manager 2.0.1
OS Releases, Toolchain, Package Examples, Cross-Compilation Examples
- Maximize 'drive time' with Systemcore, ideally with Swerve Drive FRC Robots.
- Gather feedback on hardware reliability, ease-of-use, connectors, and more.
- Eliminate as many points of confusion and frustration as possible.
| Built-in Wi-Fi Access Point SSID | SYSTEMCORE |
| Built-in Wi-Fi Access Point Password | PASSWORD |
| Systemcore Wi-Fi Access Point IP | 172.30.0.1 |
| Systemcore USB IP (Windows) | 172.28.0.1 |
| Systemcore USB IP (Linux, Mac) | 172.29.0.1 |
| Systemcore Ethernet IP | Check display |
| Default User | systemcore |
| Default Password | systemcore |
| Default Mount Locations for USB Storage | /U, /V ... |
| CAN Bus Interface Names | can_s0, can_s1, can_s2, can_s3, can_s4 |
Connect your Systemcore to your robot's power distribution board. We recommend the use of 18AWG wire with white Weidmuller ferrules.
Do not use both power inputs (Bridge + Weidmuller) simultaneously.
If the USBC-port is attached before power is applied, Systemcore will boot into flash mode.
Update to the latest stable Alpha release to get started.
Systemcore Flash Tutorial Video (60s)
Flashing OS Updates (Windows)
- Download the latest release from the systemcore-os-public repository
- Make sure the new Limelight Hardware Manager 2.0.1 is installed
- Open Limelight Hardware Manager
- Navigate to the Flash OS Tab
- Boot Systemcore into Flash Mode (see 'power' section above). You should see activity in the log window. If you don't see anything, click the 'reinstall drivers' button at .
- Select an OS .zip or .img to flash. Wait for extraction to complete.
- Refresh drives and select the one marked as Limelight/Systemcore.
- Click the “Flash” Button after it starts flashing.
- Once complete, remove USB and power from Systemcore
Full System Images will take several minutes to flash. Systemcore will soon support fast OTA updates.
Flashing OS Updates (Mac)
- Download Balena Etcher.
- Spin-up RPIBoot:
brew install libusb brew install pkg-config git clone --recurse-submodules --shallow-submodules --depth=1 https://github.com/raspberrypi/usbboot cd usbboot make cd mass-storage-gadget64 sudo ../rpiboot -d . - Boot Systemcore into Flash Mode.
- Flash with Etcher.
Flashing OS Updates (Ubuntu/Debian)
- Download Balena Etcher.
- Spin-up RPIBoot:
apt update apt install libusb-1.0-0-dev pkg-config build-essential git clone --recurse-submodules --shallow-submodules --depth=1 https://github.com/raspberrypi/usbboot cd usbboot make cd mass-storage-gadget64 sudo ../rpiboot -d . - Boot Systemcore into Flash Mode.
- Flash with Etcher.
The new Hardware Manager will soon be cross-platform.
A browser-based OS update procedure is in development.
- Boot Systemcore normally.
- Connect via USB, Ethernet, or Wi-Fi
- Navigate to http://robot.local in a web browser.
- Configure your team number in the configuration tab, and click the red "Change Team Number" Button.

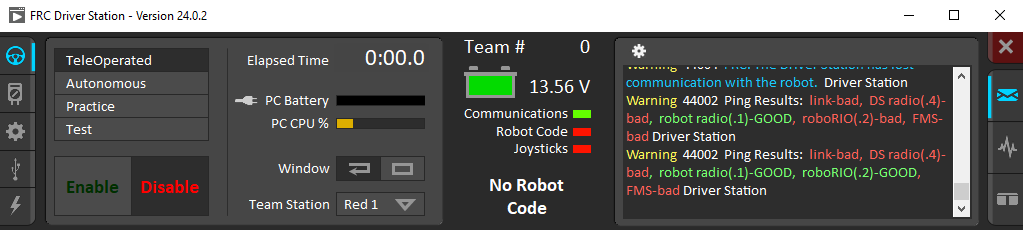
- Open the NI DriverStation and configure it with a matching team number
- The NI DriverStation should establish communications with Systemcore at this point.
Release 157 selects a default Wi-Fi channel. This is causing issues in some environments due to interference. Change the channel configuration to 'auto' and set the frequency band to 5Ghz for better connectivity.
- Boot and establish connectivity with your Systemcore.
- Ensure WPILIB 2027 has been installed.
- Open '2027_alpha1 WPILib VS Code'
- Make a new WPILib project as you normally would, and make sure to set the correct team number during the project creation step.
- Deploy the project as you normally would.
- The NI DriverStation should reflect the presence of robot code.
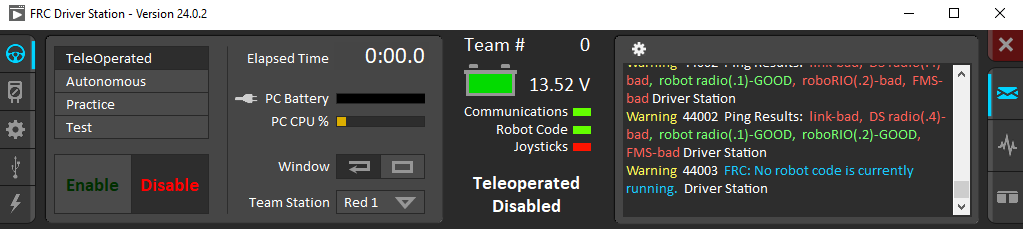
- You're now ready enable.
- After initial testing with this new, simple, project, you can return to VS Code and open existing robot projects, which should trigger the Importer to create new 2027 projects based on those existing projects.
Package Installation Tutorial Video (30s)
- Download the Elastic and AdvantageScope IPK packages.
- Navigate to the web interface.
- Click the "Add Package" card.
- Install one package at a time.
- Click the new "Elastic" or "AdvantageScope Lite" launch cards.
- Use Elastic and AdvantageScope as you normally would. A quick way to add live telemetry to your robot is the use of the SmartDashboard API (subject to change soon)
SmartDashboard.putNumber("key",value);.
Elastic and AdvantageScope Lite packages will soon be pre-baked into the OS
Package Installation Tutorial Video (30s)
- Download the CANivore IPK packages.
- Navigate to the web interface.
- Click the "Add Package" card.
- Install the usb-kernel package, and then install the usb package.
- Powercycle your Systemcore.
Check the "Mating Connector" Section of the specification sheet and this github discussion.
The I2C pinout does not match that of the roboRIO. Cables such as https://www.revrobotics.com/rev-11-1729/?searchid=4554778&search_query=4+wire+i2c will need to be modified - SCL and SDA will need to be swapped. The Systemcore pinout matches the Qwiic / ControlHub pinout.
The IO signal pins have a 4.7K pulldown resistor. Limit switches will need to short the SIGNAL pin to the +3.3V pin on Systemcore.