TON Link is a blockchain oracle based on the TON blockchain. It is an algorithm that transfers data from an external data source outside the TON network and an onchain smart contract. Essentially, the oracle serves as an intermediary between the contract and the required data source.
- Quickstart using deployed TON Link oracle
- How oracle works?
- Join TON Link by setting up a node
- Deploying your own oracle
TON Link deployed oracle contracts:
Example of a transaction to retrieve data from a link:
var msg_body = begin_cell()
  .store_uint(50, 32) ;; operation code to create a job
  .store_uint(0, 64)
  .store_ref(orig_msg) ;; information that will be returned to this contract
  .store_ref(link) ;; link
.end_cell();
var msg = begin_cell()
   .store_uint(0x18, 6)
   .store_slice(oracle_address)
   .store_grams(600000000)
   .store_uint(0, 1 + 4 + 4 + 64 + 32 + 1 + 1)
   .store_ref(msg_body)
.end_cell();
send_raw_message(msg, 3);
You can read more information in the section How do I make a request to the oracle.
In order to process the response you need to check the sender for each incoming message. If the sender of the message is an oracle then you need to check their op-code and start parsing the incoming message.
Example code for handling the response:
if(equal_slices(sender_address, oracle_address)){
   slice original_sender = in_msg_body~load_msg_addr();
   int original_time = in_msg_body~load_uint(64);
   int original_msg_value = in_msg_body~load_grams();
   slice original_msg_body = (in_msg_body~load_ref()).begin_parse()
   int jobID = in_msg_body~load_uint(64);
   int result = in_msg_body~load_uint(64);
}
Currently there are X nodes that are performing requests to the desired source of information. If you want to host your own node to contribute to this process - follow this section.
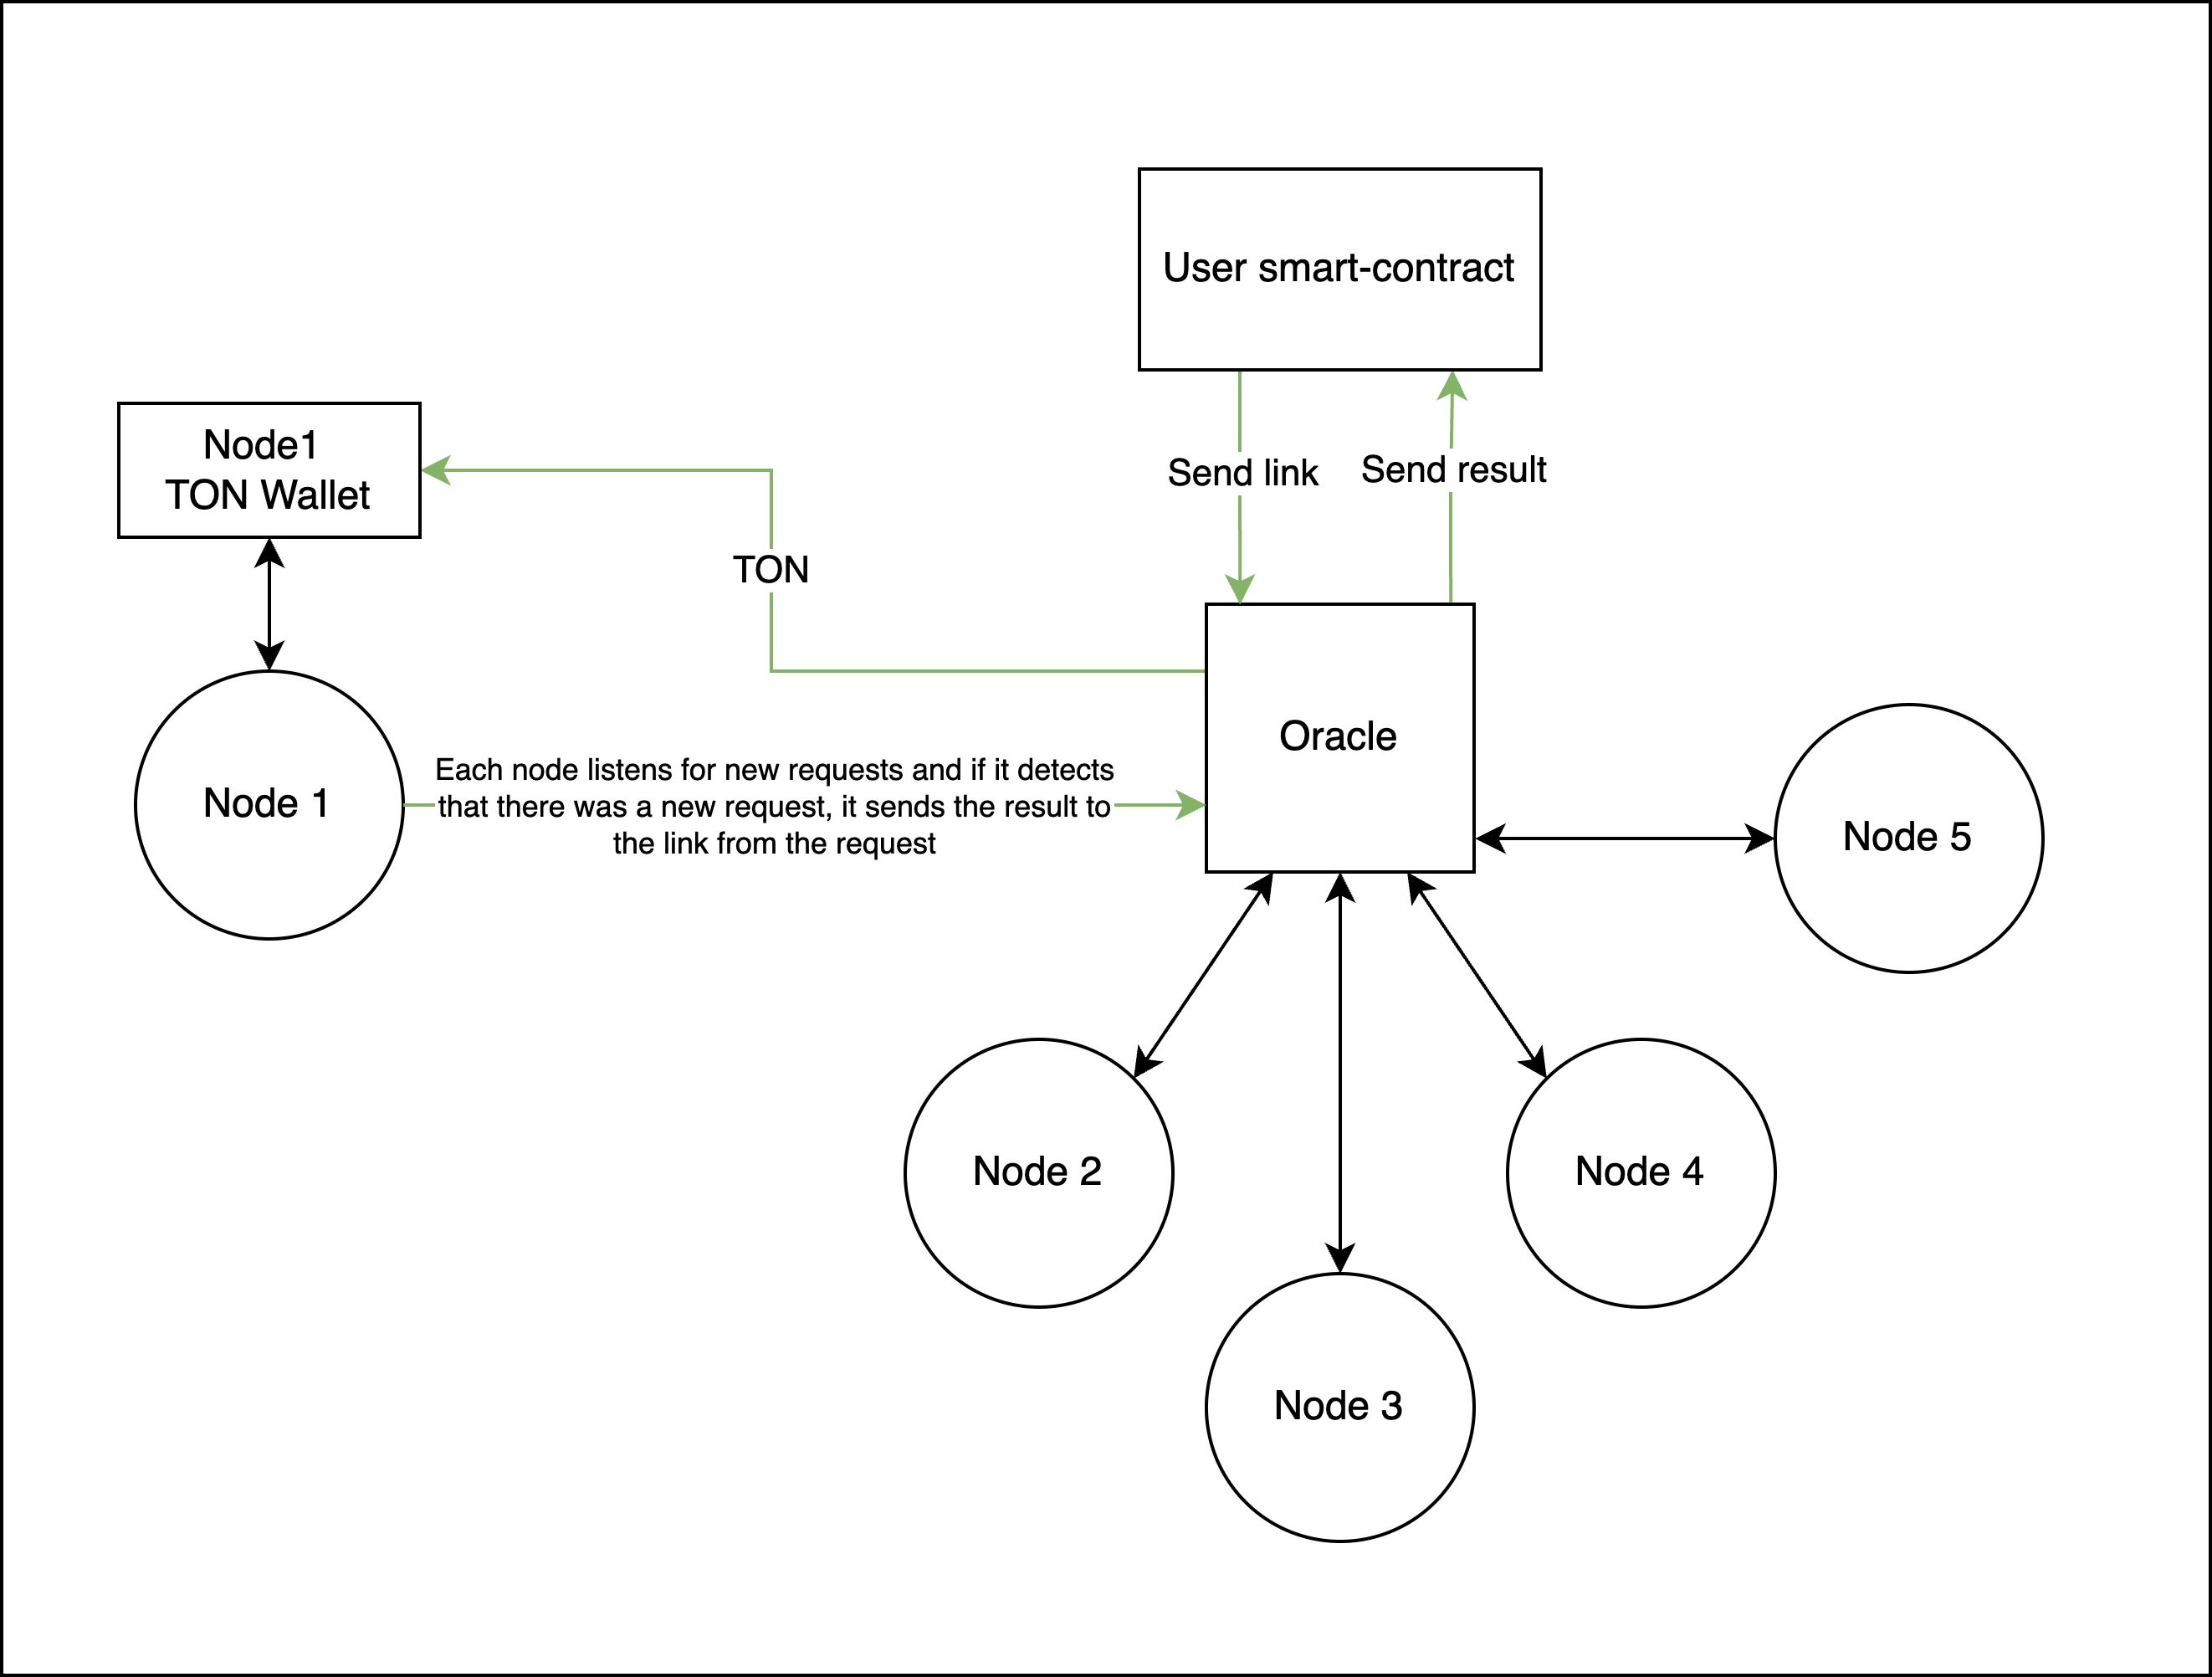
When some contract wants information from the real world it must send the oracle a message that has the operation code, the information needed by the contract and the link to get the data.
TON Link allows you to save the information you need even if you make a query to an oracle.
For example, you need to get the data of the transaction that initiated the request to the oracle. To do this you can write the information you need in the cell orig_msg, and when processing the response from the oracle you can access the data from the original transaction.
Example of a transaction to retrieve data from a link:
var msg_body = begin_cell()
  .store_uint(50, 32) ;; operation code to create a job
  .store_uint(0, 64)
  .store_ref(orig_msg) ;; information that will be returned to this contract
  .store_ref(link) ;; link
 .end_cell();
When oracle receives a new transaction with op-code 40, it runs the job::create function. This function performs certain functions:
- Checks the number of TONs sent,
- Generates a new array of addresses - this array stores addresses of nodes which will send the response,
- Creates job structure.
After completing this function, the job was created and any wallet can get information about it using the get_job_by_jobid method.
Job is a certain structure consisting of several fields:
- jobId (uint64) - sequence number
- start (uint64) - job creation time
- end (uint64) - job completion time
- status (uint1) - job status (completed / not completed) 5 content (cell) - cell that stores the link that the smart-contract sent
- address (cell) - cell that stores the list of addresses of the nodes that should send the information
- info (cell) - cell that stores information to be sent back to the smart-contract (original sender, original time, original msg_value, original msg_body)
- result (cell) - cell that stores the results that the nodes received by the link
More information about the structure of the work can be found in this file
Each node listens to get_job_by_jobid method and reads each job. If a node finds its address in the address list, it executes:
- Parses the job and writes a link to a local database (also writes the job number so you don't send the results of the same job)
- Gets information from the link
- Creates a new transaction with the body:
var msg_body = begin_cell()
  .store_uint(160, 32) ;; operation code to add result to job
  .store_uint(0, 64)
  .store_uint(jobID, 64)
  .store_uint(result, 64) ;; result at the link
.end_cell();
This message starts the job::add function. This function checks:
- Job status.
- Whether the node address is in the lists for the job
- Whether the time has not expired
- Whether this node has already responded
If a nodes fails to respond on time, she is penalized. If all check items are passed, then the function job::add_result is started.
When the runtime expires or the number of answers equals 5, the function job::complete_job is started, which completes the job and looks for the median value that will eventually become the response of the oracle.
After that, a new transaction is created with the body:
var msg_body = begin_cell()
  .store_slice(original_sender)
  .store_uint(now(), 64)
  .store_grams(original_msg_value)
  .store_ref(begin_cell().store_slice(original_msg_body).end_cell())
  .store_uint(jobID, 64)
  .store_uint(result, 64)
.end_cell();
After sending this message the work of the oracle ends.
When you want to get data from a link from an oracle you need to do a few steps:
- Send a message to create a job with the right link and data that the smart contract needs.
- Create a hook to get answers from the oracle.
Message for creating a new job:
var msg_body = begin_cell()
  .store_uint(50, 32) ;; operation code to create a job
  .store_uint(0, 64)
  .store_ref(orig_msg) ;; information needed by the contract
  .store_ref(link) ;; link
 .end_cell();
Try deploying a smart contract yourself to retrieve data from the oracle. An example of a smart contract can be found here.
To join TON Link you need to follow 2 steps:
To register in the TON Link system you need to go to https://tonlink.xyz/ (or locally frontend) and follow a number of simple steps:
- Connect a wallet via TON Connect v2 or Tonhub Connect

- To register you need to send 30 TON (or you stake amount) to the wallet oracle. You need to scan the QR-code with your wallet

- After registering you will see the main menu:

After that you can move on to configuring the node and running it.
You can run the node in two different modes: manual (you will perform all the setup and deployment actions yourself) or automatic (using Docker).
- Clone the repository:
git clone -b new-web https://github.com/ton-link/ton-link-node-v3.git - Go to the
ton-link-node-v3/clientfolder and install the necessary packages with thenpm install - You need to install PostgreSQL (>= 11.x) for the node to work.
- After installing PostgreSQL, you need to create 2 tables with commands:
CREATE TABLE job (jobID INT NOT NULL, ownership_job INT NOT NULL, status_job INT NOT NULL, place INT NOT NULL, start_time INT NOT NULL, end_time INT NOT NULL);- this command creates the job table that stores completed jobsCREATE TABLE link (jobID INT NOT NULL, count INT NOT NULL, first_link VARCHAR(255) NOT NULL, second VARCHAR(255) NOT NULL, third VARCHAR(255) NOT NULL, fourth VARCHAR(255) NOT NULL);- this command creates the link table that stores links
- In the ton-link-node-v3 folder, there is a
.env.examplefile that you need to rename to.envand modify the fields:- SEED: Your seed phrase for wallet access
- MYADDRESS: The address of your account, which should be a node
- ORACLE_ADDRESS: The oracle address (future deployed oracle addresses will be published on GitHub)
- NETWORK: Enter the network where the current version of the oracle is running (enter mainnet or testnet)
- TON_API_URL: The URL to the public API for interaction with TON
- TONCENTERKEY: The API access key (if using TON Center, you can obtain the key: for mainnet @tonapibot, for testnet @tontestnetapibot)
- DATABASE_URL: The database URL in the format postgresql://tonlink:password@your_local_ip_address:5432/tonlink_db
- WALLET_V: Your wallet version (enter in the format v3R2)
- STAKE_AMOUNT: Value equal to the minimum stake in the oracle
- Run
move.sh - After successful registration you need to run the node with the command:
node client/client
- In the ton-link-node-v3 folder, there is a
.env.examplefile that you need to rename to.envand modify the fields:- SEED: Your seed phrase for wallet access
- MYADDRESS: The address of your account, which should be a node
- ORACLE_ADDRESS: The oracle address (future deployed oracle addresses will be published on GitHub)
- NETWORK: Enter the network where the current version of the oracle is running (enter mainnet or testnet)
- TON_API_URL: The URL to the public API for interaction with TON
- TONCENTERKEY: The API access key (if using TON Center, you can obtain the key: for mainnet @tonapibot, for testnet @tontestnetapibot)
- DATABASE_URL: The database URL in the format postgresql://tonlink:password@your_local_ip_address:5432/tonlink_db
- WALLET_V: Your wallet version (enter in the format v3R2)
- STAKE_AMOUNT: Value equal to the minimum stake in the oracle
- Run
move.sh - Open the terminal at the folder address and run the command
docker-compose build, then wait for it to complete. - After successful registration, you need to start the node with the command:
docker-compose up
To deploy your oracle you need:
- Deploy the oracle smart-contract
- Launch at least 5 nodes and connect them to your oracle
When you decide to deploy an oracle smart contract you will need to decide which system it will run on. There are currently 2 types of oracle:
- Oracle based on TON - uses TON to pay requests and payments to nodes
- Oracle based on custom token - uses custom token to pay requests and payment to nodes
- Clone the repository:
git clone -b native-token-oracle https://github.com/ton-link/ton-link-contract-v3.git - Enter the newly created folder and install packages: cd ton-link-contract-v3/typescript && npm i
- Rename .env.example to .env
- Modify the following fields in the .env file:
- mode: Set to testnet or mainnet, depending on the network you want to deploy the oracle in.
- mnemonic: Your seed phrase for deploying the oracle.
- admin: The address of the oracle administrator, who can change the minter address and token wallet address. Be cautious (it is recommended to use the address from which the deployment will be carried out).
- To deploy the oracle, you need run the command
npm run deployNativeOracle. The console will display the oracle address, which is also duplicated in the oracle.txt file. Wait for the transaction to complete (check the explorer). If the transaction fails, don't worry, this is normal.
- Clone the repository:
git clone -b native-token-oracle https://github.com/ton-link/ton-link-contract-v3.git - Enter the newly created folder and install packages: cd ton-link-contract-v3/typescript && npm i
- Rename .env.example to .env
- Modify the following fields in the .env file:
- mode: Set to testnet or mainnet, depending on the network you want to deploy the oracle in.
- mnemonic: Your seed phrase for deploying the oracle.
- jMinter: The address of the token minter, needed for rewarding oracles for providing information.
- admin: The address of the oracle administrator, who can change the minter address and token wallet address. Be cautious (it is recommended to use the address from which the deployment will be carried out).
- To deploy the oracle, send two transactions:
- Transaction 1: Deploy the contract. In the
scripts/deployCustomTokenOracle.ts file, comment out line 105. Then, run the commandnpm run deployCustomTokenOracle. The console will display the oracle address, which is also duplicated in the oracle.txt file. Wait for the transaction to complete (check the explorer). If the transaction fails, don't worry, this is normal. - Transaction 2: Change the token wallet address. In the
scripts/deployCustomTokenOracle.tsfile, comment out line 104 and uncomment line 105. Run the commandnpm run deployCustomTokenOracleagain. Check the explorer; the new transaction should succeed without errors. To verify that everything is correct, go back to the scripts/deployCustomTokenOracle.ts file and comment out line 105. Run the npm run deploy command again and wait. The last thing that should appear in the console is the word "true." If so, congratulations, you have deployed your oracle.
- Transaction 1: Deploy the contract. In the