$ npm install

$ npm run build:watch
Reactについての説明は参考になる記事が沢山あるので、そちらを参照してください。
reduxはfluxという設計思想に影響されて生まれたアーキテクチャです。
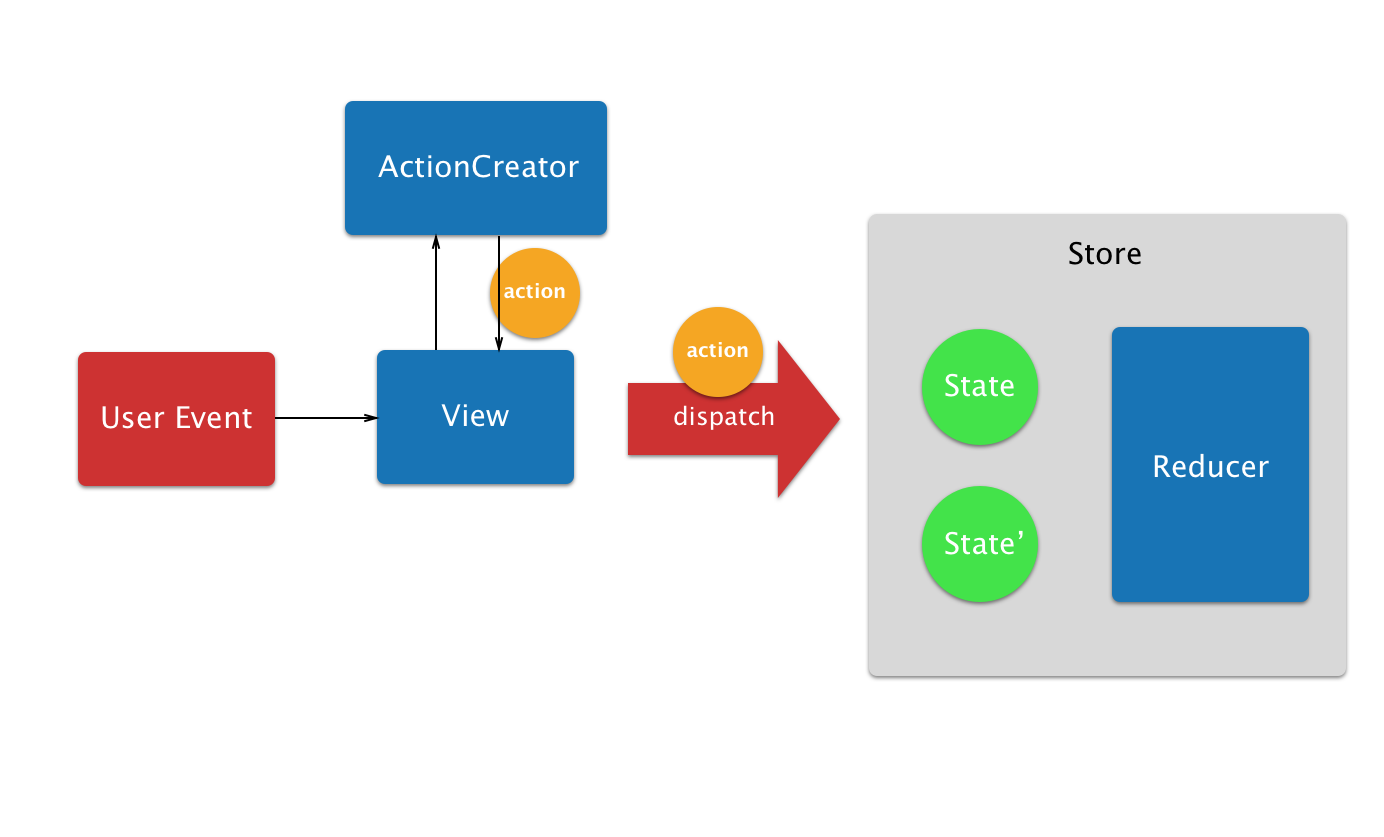
reduxではStore という場所でアプリケーションの状態を一元管理し、
その値を変更するとViewが更新されます。
Storeを更新したいときは、ViewがActionCreatorからActionオブジェトを受け取りStoreにdispatchします。
そのactionオブジェクトの情報を元にreducerが新たにStateを作り、Storeが更新されます。
初めにこの設計思想に登場するキーワードの解説からしていきます。
- Store
- Reducer
- State
- ActionCreator
- Action
- dispatch
- View -> Reactが担当する
アプリケーションの状態とは
Todoリストでのアプリケーションの状態なら、すべてのタスクやそのタスクが終わっているかどうかなどのことです。
-
Storeの動き
Storeの中には
ReducerとStateという概念があり、あるきっかけでReducerが新しいStateを作り、Storeを更新します。reduxという思想の中では、Storeを更新するのはreducerだけ
-
Reducerの動き
Reducerは
dispatchされたactionオブジェクトに基づきStoreのStateを更新します。 先ほど出てきたあるきっかけとはactionブジェクトがStoreにdispatchされた時です。dispatchについては後ほど説明します。
Actionオブジェクトとは
ReducerがどのようにStoreを更新するかを定義したオブジェクト
実際にコードにすると以下のようになります
return {
    type: 'ADD_TODO',
    text: text
}
Actionオブジェクトはtypeとpayloadを持っていて、このtypeによってReducerはどの処理を行うかを判断します。
このActionオブジェクトを作るのがActionCreatorの責務です。
実際にコードにすると以下のようになります
function add_todo(text) {
	return {
	    type: 'ADD_TODO',
	    text: text
	}
}
つまりActionCreatorはただ単にActionオブジェクトを返しているだけです。
store.dispatch(Actionオブジェクト)のような感じで使うことが出来ます。
これでReducerにActionオブジェクトを届けることが出来ます。
先ほどのactionオブジェクトと届けたい場合は
store.dispatch(addTodo('hoge'))
のようになります。
今回はReactが担当します。
fluxでstoreの更新を検知する場合は、componentDidMountなどのライフサイクルを使ってaddEventListenerで監視する必要があります。
ですが、reduxではProviderにStoreを渡すので特にこちらが何か書く必要はありません。
Providerは実際にコードを書く時に出てきます。
- /src/
	| - actions/
		| - actionTypes/
			| - counter.js
		| - actionCreators/
			| - counter.js
	| - store/
		| - reducers/
			| - index.js
			| - counter.js
		| - configureStore.js
	| - components/
		| - App.jsx
		| - Home.jsx
	| - containers/
		| - HomeContainer.js
	| - app.js
- /index.html
- /package.json
- /webpack.config.js
今回はこんな感じのディレクトリ構成にしてみました。
まずはreduxを構成するためにstoreやreducerやcontainerなどを作る必要があります。
今回は画面に数字が表示されていて、数字をクリックするとその数字が1増えるといったアプリケーションを作り、reduxの流れを体感したいと思います。
その前に、まずはReactで書いたViewを表示できるようにしましょう。
Reactはもう知ってるという人は reduxの基盤を作る までスキップしてください。
今回使うnode_moduleは以下の通りです。
- react
- react-dom
- redux
- react-redux
- babel-core
- babel-loader
- babel-preset-es2015
- babel-preset-react
- webpack
$npm init
上のコマンドを実行するとpackage.jsonが生成されます。
その中のscripts の部分を以下のように書き足してください。
  "scripts": {
    "prebuild": "rm -rf dist/",
    "build": "webpack --color --progress",
    "build:watch": "npm run build -- --watch",
    "test": "echo \"Error: no test specified\" && exit 1"
  },
その後、以下のコマンドでpackageをinstallしてください。
$ npm install --save react react-dom redux react-redux babel-core babel-loader babel-preset-es2015 babel-preset-react webpack
-
まずは
Hello World!と表示するcomponentを書きます。/src/components/App.jsx import React from "react" const App = () => ( <h1>Hello World!</h1> ) export default App
-
componentをDOMに登録する/src/app.js import React from 'react' import { render } from 'react-dom' import App from './components/App.jsx' render ( <App/>, document.getElementById('react') )
-
srcの中身をトランスパイルしてbundle.jsを生成する
今回はwebpackを使うので、下記のようなwebpackのconfigファイルを用意します。
/webpack.config.js

var path = require("path")

module.exports = {
    entry: "./src/app.js",
    output: {
        path: path.resolve(__dirname, "./dist"),
        filename: "bundle.js",
        libraryTarget: "umd"
    },
    module: {
        loaders: [
            {
                test: /\.jsx?$/,
                loader: "babel-loader",
                exclude: /node_modules/,
                query: {
                    presets: ["es2015","react"]
                }
            }
        ]
    }
}
トランスパイルするときは
$ webpackでできます。
-
index.htmlからbundle.jsを呼び出す
/index.html

<!DOCTYPE html>
<html lang="ja">
<head>
    <meta charset="UTF-8">
    <title>React + redux Tutorial</title>
</head>
<body>
    <div id="react"></div>
    <script src="./dist/bundle.js"></script>
</body>
</html>
ブラウザでindex.htmlを読み込むと
Hello World!と表示されるはずです。
さて、ReactのViewは表示できたので、今度は本題のreduxについて実装していきます。 まずは、reduxの基盤からです。
-
reducersを作る
/src/store/reducers/index.js

import { combineReducers } from 'redux'

const reducers = combineReducers({
    // ここにreducerを入れる
})

export default reducers
複数のreducerを結合してreducersを作ります
-
storeを作る
/src/store/configureStore.js

import { createStore } from 'redux'
import reducers from './reducers'

export const store = createStore(
    reducers
)
先ほど生成したreducersをstoreに入れて、storeを作ります
-
storeをReactのViewに渡す
/src/components/App.jsx
import React from "react"
import { Provider } from 'react-redux'
import { store } from '../store/configureStore'

const App = () => (
    <Provider store={store}>
        <h1>Hello World!</h1>
    </Provider>
)

export default App
さて
Providerというものが出てきました。 これがStoreを管理していて、mapStateToPropsなどを使いcomponentにStoreのstateを渡します。mapStateToPropsについては後ほど解説します。
これでreduxの型は完成しました。まだcombineReducersの中にreducerを登録していないのでerrorが出ますが一旦放置します。 reducerはあとで作るのでその時に登録します。
工程としては以下の通り
- ActionTypeを定義
- ActionCreatorの作成
- reducerを作成
- connectでstateとhandlerを渡す
- stateとhanderを呼び出す
- ActionTypeを定義
まずはactionオブジェクトの中で定義するtypeだけを宣言します。
そうすることでactionオブジェクトを作る時やreducerを作る時にimportして使えるので、タイポなどがなくなります。
今回はcountを加算するのでADD_COUNTというtypeにしました。
/src/actions/actionTypes/counter.js

export const INCREMENT = 'INCREMENT'- ActionCreatorの作成
先ほど作ったtypeをimportしてActionCreatorを作ります。
/src/actions/actionCreators/counter.js

import { INCREMENT } from '../actionTypes/counter'

export const increment = () => {
    return {
        type: INCREMENT
    }
}今回payloadはいらないので、Actionオブジェクトの内容はtypeのみです。
- reducerを作成
reduxの中でstoreを更新するための責務を持つreducerを作っていきます。
まずはActionTypeをimportします。
initialStateとしてreducerごとに初期値を定義しています。
今回は現在のカウントの状態を保持するためにcountを定義しています。
reducerの第2引数にはdispatchされたActionオブジェクトが入るので、先ほど定義したtypeを元にswitchします。
その時に先ほどimportしたActionTypeを使用します。
実際にコードにすると以下のようになります。
/src/store/reducers/counter.js

import { INCREMENT } from '../../actions/actionTypes/counter'

const initialState = {
    count: 0
}

export function counter(state = initialState, action) {
    switch (action.type) {
        case INCREMENT:
            return Object.assign({}, state, {
                count: state.count + 1
            })
        default:
            return state
    }
}
returnで新しいオブジェクトを作っていることに注目してください。
reduxでは現状のStateを書き換えることはせず、新しいStateを作ります。
なのでObject.assignを使い、現状のStateに新しく状態を足したオブジェクトを返しています。
こんな感じです。
return Object.assign({}, state, {
    count: state.count + 1
})
さて、reducerを作ったのでcombineReducersに登録します。
※reducerを登録するのは忘れがちなので注意してください
/src/store/reducers/index.js

const reducers = combineReducers({
    counter
})
※redux三原則に「reducerは純粋関数でないといけない」という制約があるのでそのあたりも注意してreducerを作りましょう
- connectでstateとhandlerを渡す
さきほどmapStateToPropsを使いStoreのstateをcomponentに渡すと言いましたが、具体的な方法を書いていなかったので、ここで解説します。
具体的にはreact-reduxの中にあるconnectを使います。
実際にコードにすると以下のようになります。
/src/containers/HomeContainer.js

import { connect } from 'react-redux'
import Home from "../components/Home.jsx"
import { increment } from '../actions/actionCreators/counter'

const mapStateToProps = state => {
    return {
        count: state.counter.count
    }
}

const mapDispatchToProps = dispatch => {
    return {
        increment: () => {
            dispatch(increment())
        }
    }
}

export default connect(mapStateToProps, mapDispatchToProps)(Home)ここでは、connectを使いcomponentにstateとhandlerを渡します。
関数名をmapStateToPropsとmapDispatchToPropsにしていますが、必ずしもそうでないといけないわけではありません。
connectの第1引数にstateから必要な情報を取り出してreturnしてくれる関数、
第2引数にcomponent内で使う関数をreturnしてくれる関数を登録します。
今回のmapStateToPropsでは引数のstateで受け取ったstoreのstateの中から、counter(後で作るreducer)のcountをHomeComponentに渡します。
そうすることで、HomeComponent のpropsにcountとhandlerを渡すことができます。
自分はconnectを使いcomponentにstateを渡す責務はcontainerに持たせることにしています。
- stateとhanderを呼び出す
先ほどconnect関数を使いStateとhandlerをpropsに渡したのでthis.propsから取り出してみましょう。
/src/components/Home.jsx
import React from 'react'

export default class Home extends React.Component {
    constructor(props) {
        super(props)
    }

    render() {
        return (
            <div>
                <h1 onClick={() => this.props.increment()}>{this.props.count}</h1>
            </div>
        )
    }
}containerを作ったので、App.jsxにはHome.jsxではなくHomeContainer.jsを読み込みます。
/src/components/App.jsx
import React from "react"
import { Provider } from 'react-redux'
import { store } from '../store/configureStore'
import HomeContainer from '../containers/HomeContainer'

const App = () => (
    <Provider store={store}>
        <HomeContainer/>
    </Provider>
)

export default App
さぁ、一通りのファイルを作ったので、数字をクリックしてみましょう。
ちゃんと加算されたでしょうか??
reduxにはmiddlewareというものが用意されていて、非同期的な処理や、actionごとに何か処理を実行したい場合などに利用します。
ただ、少しややこしいのでreduxのflowがしっかりと理解できてから手を出す方が良いでしょう。