A job portal named careerconnect built with the MERN stack (MongoDB, Express, React, Node.js).
👉 Live -click here
👉 Figma Desigin - click here
👉 Modules - click here
👉 Database design - click here
👉 Api Documentation - click here
- Features
- Technologies Used
- Architecture
- App Connection
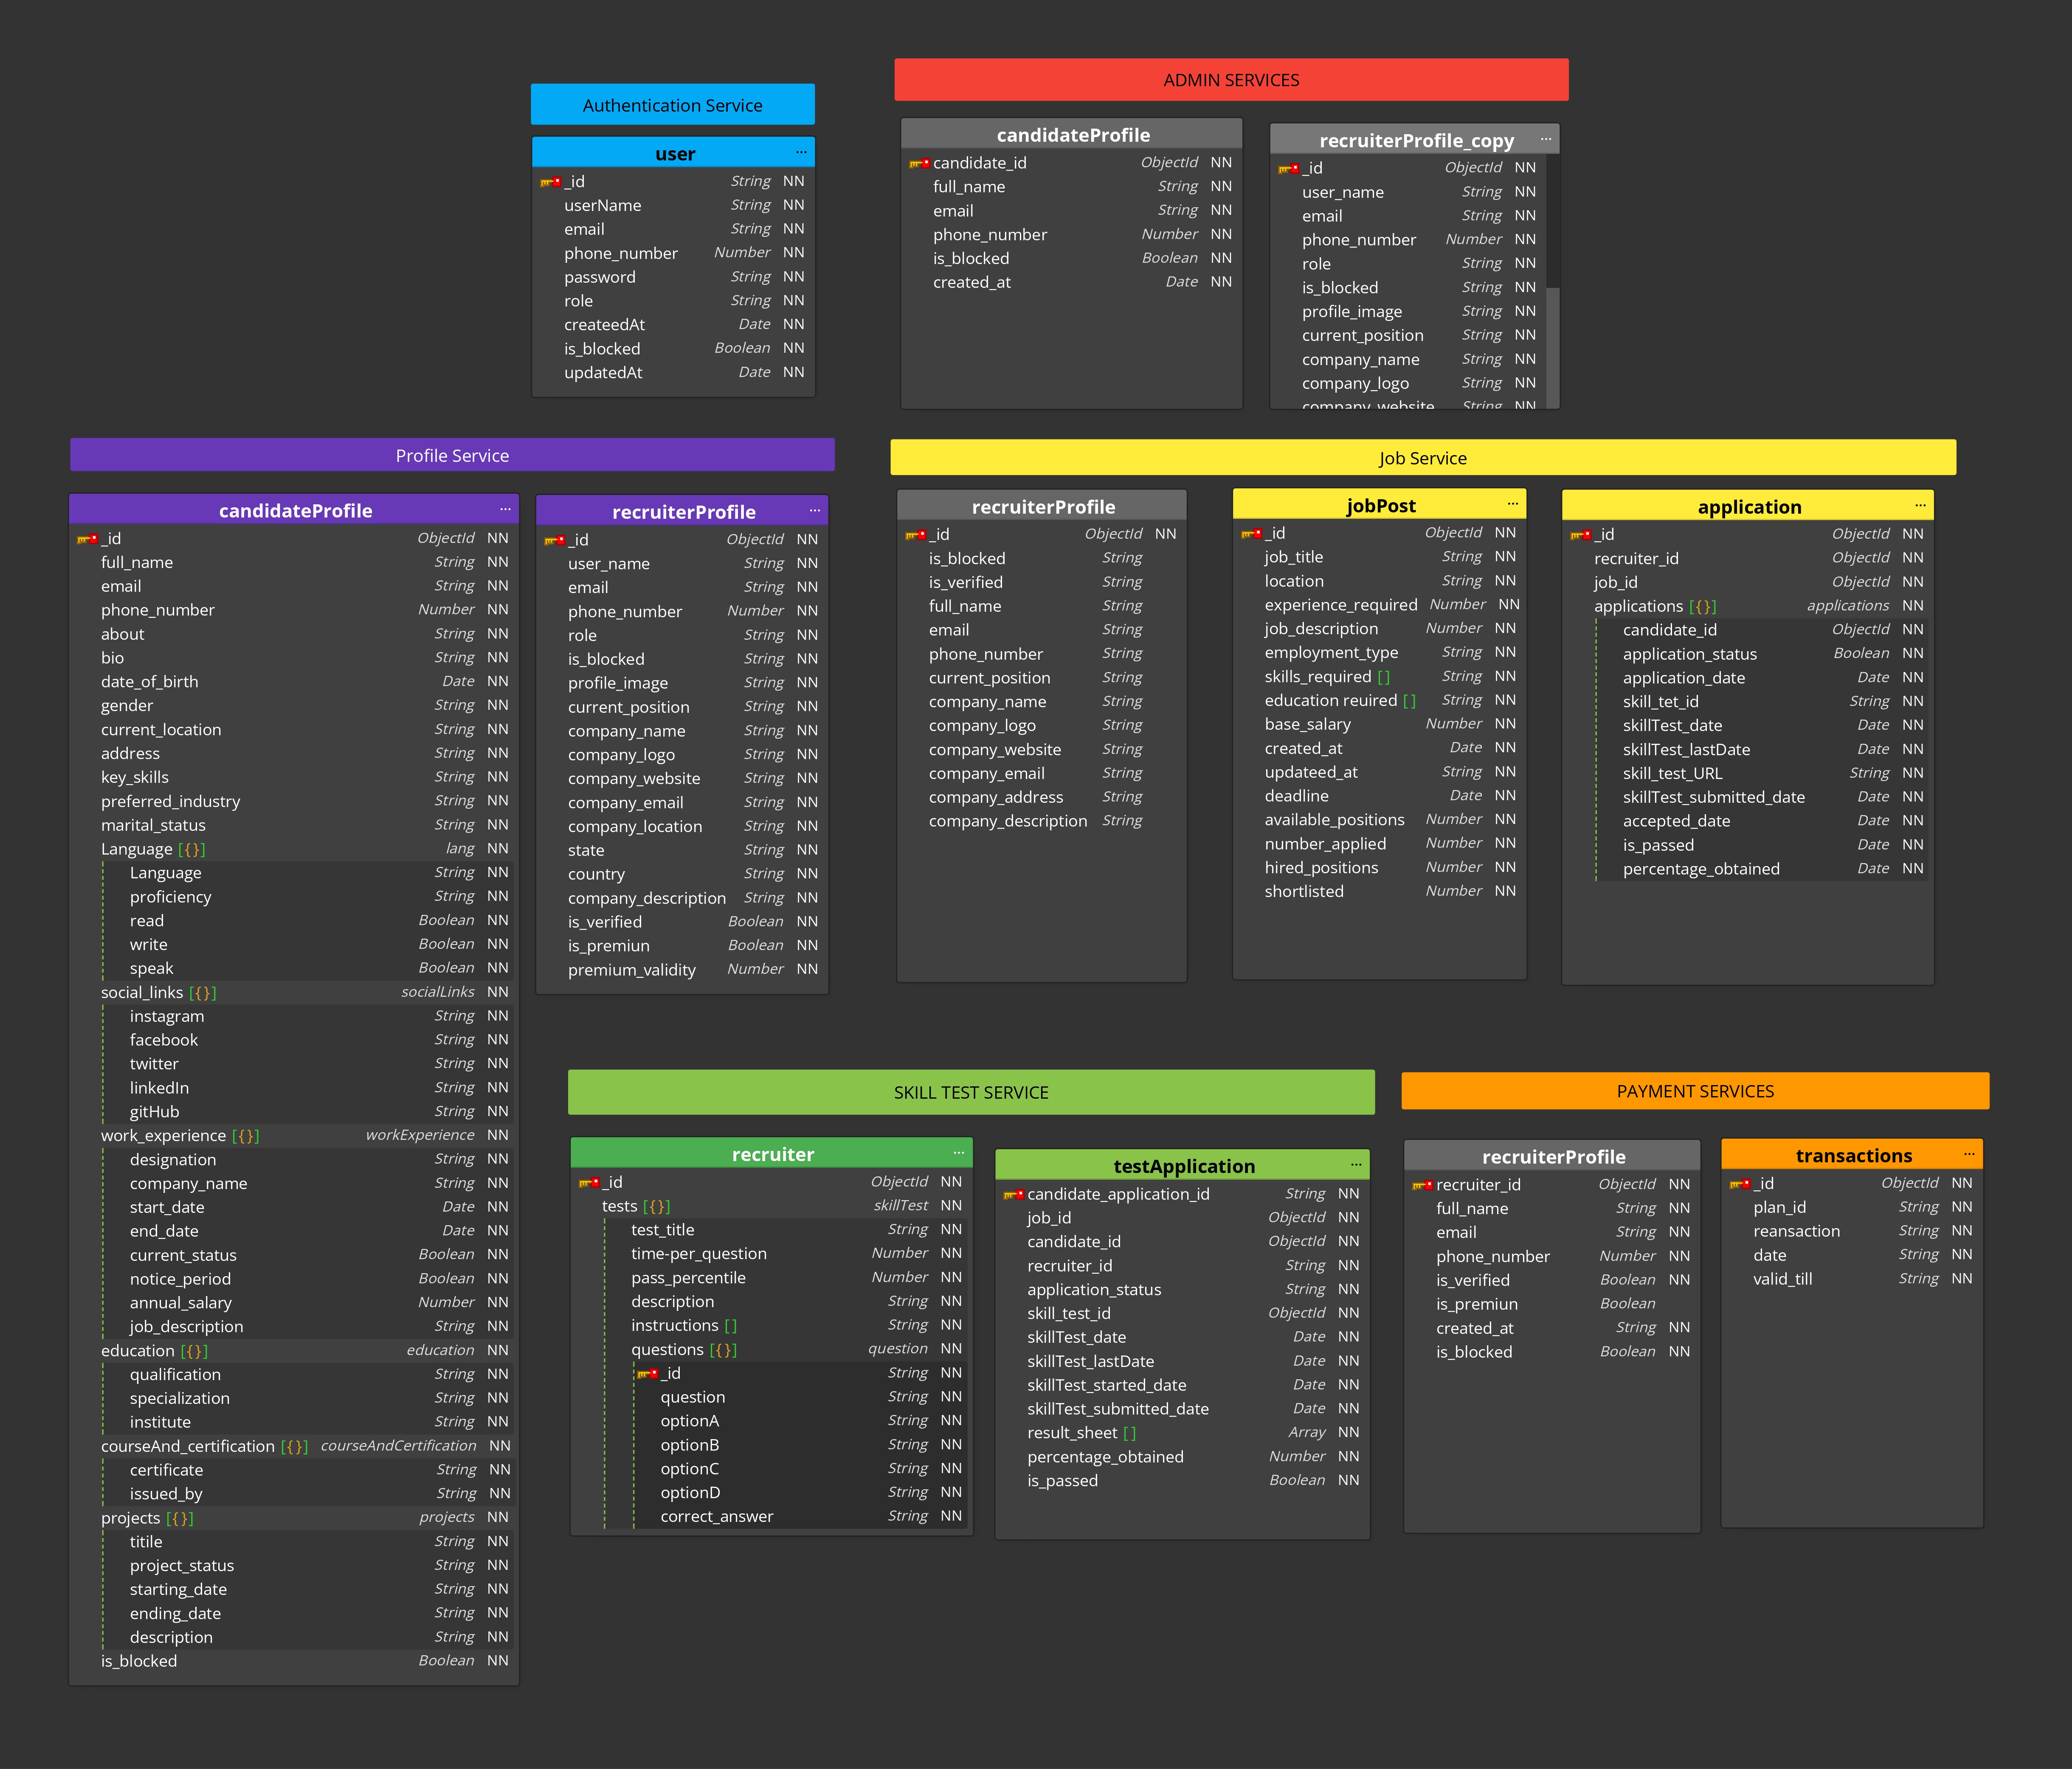
- Database Design
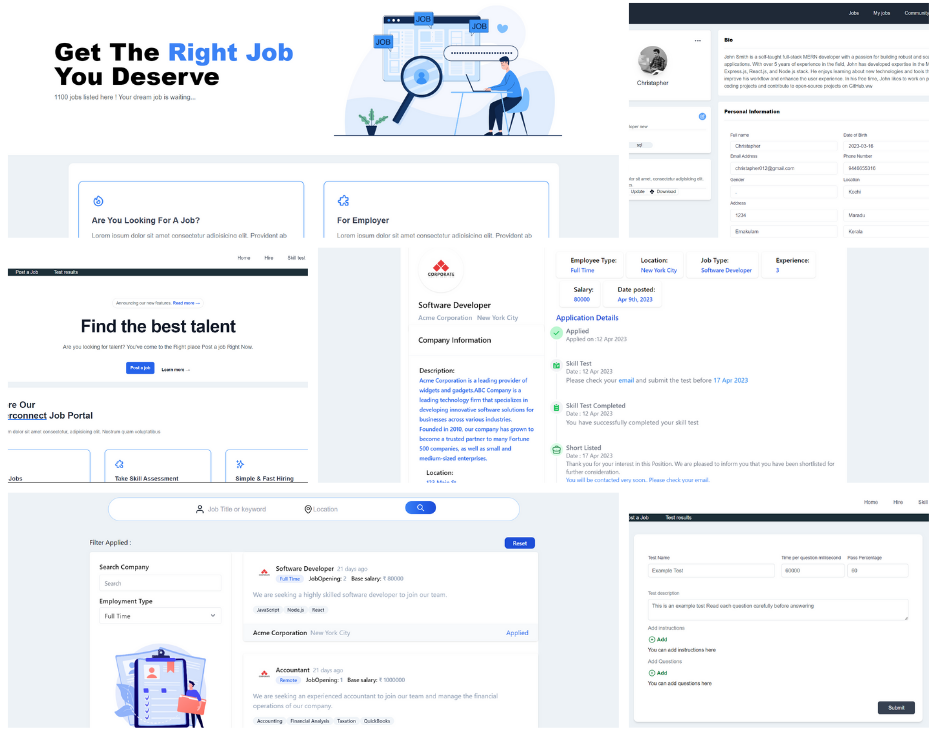
- Screenshots
- Getting Started
- Contact
- This project is divided into 3 modules Admin, Candidate, Recruiter
- Job seekers can register and update their profiles to increase their chances of getting hired.
- Job searching and filtering capabilities to help users find relevant job opportunities.
- Users can apply for jobs and track the processing stages of their applications.
- Recruiters can post job openings, review resumes, and add skill tests to identify the best candidates for the job.
- Skill tests are sent directly to candidates via email, and they can take MCQ tests to showcase their skills.
- Recruiters can view the results of the skill tests and make informed decisions about which applications to accept or reject.
- Admin has full management capabilities over the entire application, including managing candidate and recruiter accounts.
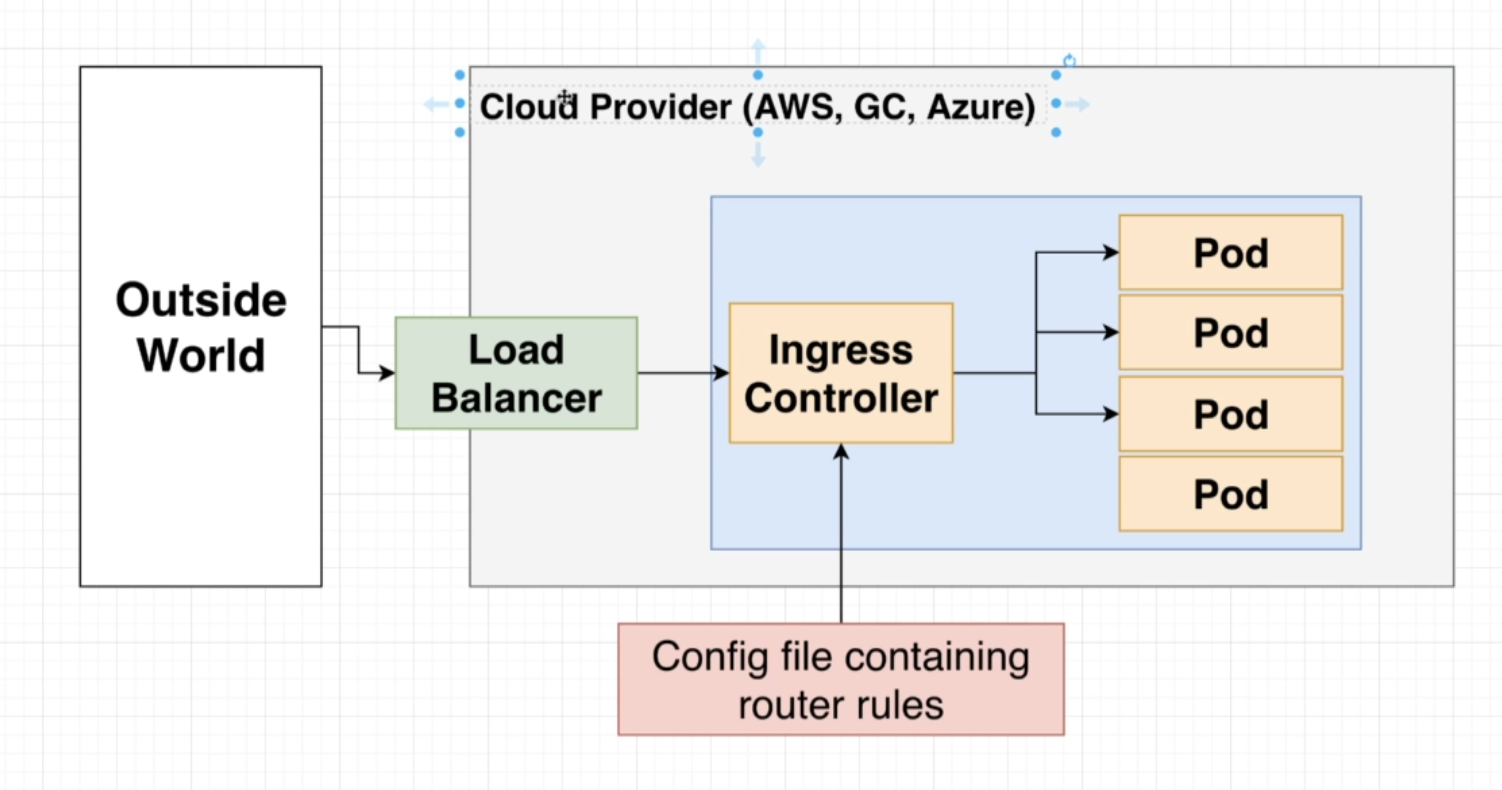
- This project is designed and developed with scalability & maintainability in mind.
- The project is containerized using docker and orchestrated using Kubernetes.
- Deployment is done using Digital Ocean-Kubernetes-cluster and a CD pipeline setup using GitHub Actions.
| Stack | Technology Used |
|---|---|
| Frontend | React, Redux, Tailwind CSS |
| Backend | Node js, Express js |
| Authentication | JSON Web Token JWT |
| Database | Mongo DB |
| Version control | Git |
| Image storage | Cloudinary |
| Architecture | Microservices |
| Messaging/Queue | NATS streaming |
| Containerization and Orchestration | Docker and Kubernetes |
| Deployed | Digital Ocean Kubernetes Clusters |
| CD | GitHub-actions |
| Monitoring Deployment | Prometheus & Graphana |
It is following a Microservice Architecture which is stateless with an asynchronous message queue system that is setup using NATS streaming.
This microservices architecture employs a decentralized approach to data management, where each service is responsible for storing its own data in its own database. To enable communication and data synchronization between services, we use a message queue. When a service makes any changes to its data, it emits an event through the message queue, which other services can consume to update their own data. This architecture allows us to achieve better scalability, reliability, and flexibility, while also reducing dependencies and promoting loose coupling between services
The whole project divided into 5 services based on its functionality named auth, admin, jobs, profiles, skill test and each services containerised and orchestrating using Kubernetes
- Auth service - Authenticating users (admin, candidate, recruiter) using JWT.
- Profiles service - To manage profile details of both candidate and recruiters.
- Job service - Managing job listing, application, and other jobs related services.
- Skill test service - Recruiters can upload MCQ and skill test service is responsible for taking time based online test and evaluate the test result and send to the job service
- Admin service - Admin can monitor and manage candidates and recruiters.
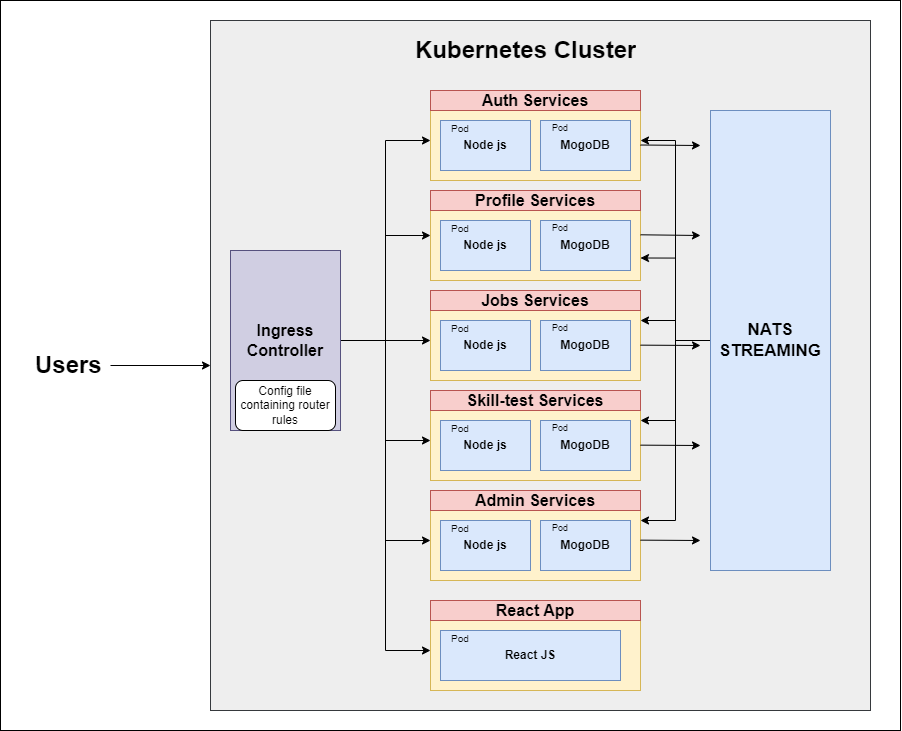
Each service can use MongoDB to store its own data independently of other services. This means that each service has its own MongoDB instance running, and data is not shared between services. This allows for better isolation, scalability, and flexibility, as each service can manage its own data as needed without interfering with other services.
- Docker Desktop
- Enable Kubernetes in the Docker Desktop
- Install Ingress Nginx
- Install Skaffold - Optional
- Add careerconnect.dev to your hosts file pointing to 127.0.0.1 (Mac & Linux /etc/hosts and Linux)
### Create the required secrets (example)
kubectl create secret generic careerconnect-base-url --from-literal=BASE_URL=<---your_jwt_secret_value--->
kubectl create secret generic careerconnect-jwt-secret --from-literal=JWT_KEY=<---your_jwt_secret_value--->
kubectl create secret generic careerconnect-gmail-secret --from-literal=GMAIL_PASSWORD=<---your_gmail_secret_value--->       //for node mailer
kubectl create secret generic careerconnect-admin-secret --from-literal=ADMIN_PASSWORD=<---your_admin_password--->
kubectl create secret generic careerconnect-firebase-api-key --from-literal=FIRE_BASE_API_KEY=<---your_admin_secret_value--->
kubectl create secret generic careerconnect-mongo-uri --from-literal=MONGO_URI_ATLAS=<---your_mogo_db_altas_uri--->
kubectl create secret generic careerconnect-cloudinary-config --from-literal=CLOUD_NAME=<--your_cloud_name--> --from-literal=API_KEY=<--your_cloud_key--> --from-literal=API_SECRET=<--your_cloud_api_secreat-->
kubectl create secret generic careerconnect-google-oauth  --from-literal=CLIENT_SECRET=<--your_client_secret--> --from-literal=CLIENT_ID=<--your_client_id-->

Note: If you have Stripe Account
kubectl create secret generic stripe-secret --from-literal STRIPE_KEY=<REPLACE_HERE_YOUR_PRIVATE_STRIPE_KEY>
If you don't have a Stripe Account
kubectl create secret generic stripe-secret --from-literal STRIPE_KEY=123456

#### Skaffold (Optional)

# If Skaffold is installed
skaffold dev

If Skaffold is not installed
kubectl apply -f infra/k8s-dev
kubectl apply -f infra/k8s

### Setup /etc/hosts
$ grep ticket /etc/hosts
127.0.0.1 ticketing.dev

### Open your browser and type  http://ticketing.dev
Snapshot of Application (see above)
Download Skafold (Refer to https://skaffold.dev/docs/install/)
Open a console for each microservice:
Run `npm install` for the dependencies
Inside each console run `docker build -t your-docker-id/microservice-name .` to create an image
Run `docker push your-docker-id/microservice-image` for each image you created to push them to Docker Hub
Go to each .yaml file inside ./infra and change all davarski references to your-docker-id
Open a console inside the root folder and run `skaffold dev`, this will run all the deployment config files
If the first time fail, shut it down a re-run it
Add 127.0.0.1 ticketing.dev on the last line of your hosts file
Open a web browser and go to ticketing.dev, the react app should be running
Created by @ChristapherAntony - feel free to contact me!