![]()
The BlinkID Android SDK is a comprehensive solution for implementing secure document scanning and extraction. It offers powerful capabilities for extracting data from a wide range of identification documents.
- Quick Start
- Device requirements
- Pre-bundling the SDK resources in your app
- Choosing between Composable and default scanning activity
- Customizing the look and UX
- Changing default strings and localization
- Using SDK through
BlinkIdScanActivity - Completely custom UX (advanced)
- Using SDK with Java and Views
- Troubleshooting
- Additional info
- Open Android Studio.
- In
Quick Startdialog choose Open project. - In
Filedialog select BlinkID folder. - Wait for the project to load. If Android Studio asks you to reload the project on startup, select
Yes.
- sample-app emonstrates quick and straightforward integration of the BlinkID SDK using the provided UX in Jetpack Compose to scan a document and display the results.
- direct-api-sample-app demonstrates the functionality of BlinkID SDK by avoiding the document scanning process and without using the blinkid-ux library. This approach should be used if you are obtaining document images via other methods.
- java-sample-app demonstrates quick and straightforward integration of the BlinkID SDK using only Java (without Jetpack Compose) through
BlinkIdScanActivity.
The BlinkID library is available on Maven Central repository.
In your project root, add mavenCentral() repository to the repositories list, if not already present:
repositories {
    // ... other repositories
    mavenCentral()
}
Add BlinkID as a dependency in module level build.gradle(.kts):
dependencies {
    implementation("com.microblink:blinkid-ux:7.6.1")
}
-
A valid license key is required to initialize the document capture process. You can request a free trial license key, after you register, at Microblink Developer Hub.. License is bound to the application ID of your app, so please ensure you enter the correct application ID when asked.
-
You first need to initialize the SDK and obtain the
BlinkIdSdkinstance:
val maybeInstance = BlinkIdSdk.initializeSdk(
  context,
  BlinkIdSdkSettings(
    licenseKey = <your_license_key>,
)
)
when {
  maybeInstance.isSuccess -> {
    val sdkInstance = maybeInstance.getOrNull()
    // use the SDK instance
  }

  maybeInstance.isFailure -> {
    val exception = maybeInstance.exceptionOrNull()
    Log.e(TAG, "Initialization failed", exception)
  }
}
BlinkIdSdk.initializeSdk is a suspend function which should be called from a coroutine.
- Use
BlinkIdCameraScanningScreencomposable to the scanning UX and obtain results:
BlinkIdCameraScanningScreen(
  sdkInstance,
  uiSettings = UiSettings(),
  uxSettings = BlinkIdUxSettings(),
  cameraSettings: CameraSettings = CameraSettings(),
  sessionSettings = BlinkIdSessionSettings(),
  onScanningSuccess = { scanningResult ->
    // scanningResult is BlinkIdScanningResult
  },
  onScanningCanceled = {
    // user canceled the scanning
  }
)After the document scanning session is finished the SDK returns an object of type BlinkIdScanningResult. The object contains extraction process details, document class info, and extraction results. Results are separated into general results and section results. General results are a combined set from each entry with the individual data points taken from the most reliable data source (Barcode > MRZ > Visual).
Section results are separated by document side and by data source (Barcode, MRZ, Visual). Each of these individual data sources are available if present on the document (and allowed through scanning settings).
BlinkID SDK requires Android API level 24 or newer.
To perform successful scans, the camera preview resolution must be at least 1080p. Note that the camera preview resolution is not the same as the video recording resolution.
BlinkID SDK allows the selection of higher and lower resolutions of camera selected for the scanning process. Additionally, if the deivce has more than one camera, it is possible to select between CameraLensFacing.LensFacingBack and CameraLensFacing.LensFacingFront. Both settings are accessible through CameraSettings in all implementation methods.
NOTE: Most of the front facing cameras on Android devices are lower quality and do not have autofocus. This highly impacts their ability to successfully complete the scan.
BlinkID SDK is distributed with ARMv7 and ARM64 native library binaries.
BlinkID is a native library written in C++ and available for multiple platforms. Because of this, BlinkID cannot work on devices with obscure hardware architectures. We have compiled SDK's native code only for the most popular Android ABIs.
If you are combining BlinkID library with other libraries that contain native code in your application, make sure to match the architectures of all native libraries. For example, if the third-party library has only ARMv7 version, you must use exactly ARMv7 version of BlinkID with that library, but not ARM64. Using different architectures will crash your app at the initialization step because JVM will try to load all its native dependencies in the same preferred architecture and fail with UnsatisfiedLinkError.
To avoid this issue and ensure that only architectures supported by the BlinkID library are packaged in the final application, add the following statement to your android/defaultConfig block inside build.gradle.kts:
android {
    ...
    defaultConfig {
        ...
        ndk {
            // Tells Gradle to package the following ABIs into your application
            abiFilters += listOf("armeabi-v7a", "arm64-v8a")
        }
    }
}
If you want to reduce the SDK startup time and network traffic, you have option to pre-bundle the SDK resources as assets into your application. All required resources are located in libs/resources/assets/microblink/blinkid folder. You can bundle it to your application by including the mentioned folder to application's assets. Copy mentioned libs/resources/assets/microblink directory to src/main/assets folder of your application module (or appropriate folder for desired app flavor).
Use BlinkIdSdkSettings to set the following options when instantiating the SDK:
BlinkIdSdkSettings(
    licenseKey = <your_license_key>,
    /* define license key licensee (optional) */
    // licensee = <your_license>,
    /* disable or enable resource download /*
    downloadResources = false,
    /* define path if you are not using a default one */
    // resourceDownloadUrl = <download_path>,
    /* define path if you are not using a default one: "microblink/blinkid" */
    // resourceLocalFolder = <path_within_app_assets>
    /* set custom timeout on resrouces download (10 seconds by default) /*
    // resourceRequestTimeout = RequestTimeout.DEFAULT,
    /* set custom proxy URL (needs to be allowed by license) /*
    // val microblinkProxyUrl: String? = null
)There are two primary methods for integrating the BlinkID SDK into your Android application: via the BlinkIdCameraScanningScreen composable or the BlinkIdScanActivity activity. Each approach offers distinct advantages and trade-offs. The following guidelines can help determine the most suitable integration method for your use case.
When to use the BlinkIdCameraScanningScreen composable:
- Single-activity architecture: If your application is structured around a single activity, this composable is the recommended integration point
- Immediate scanning readiness: The composable allows preloading of all required resources and license validation before initiating the scanning process, ensuring that scanning can begin instantly without additional initialization delays
- Advanced scanning customizations: This method supports extensive customization of the scanning workflow and user experience (see Advanced customizations)
When to use the BlinkIdScanActivity activity:
- Java-only applications: If your app is implemented entirely in Java, using the activity is preferable; while composables can be wrapped in Views for Java integration, the BlinkID SDK leverages concurrency features that are not natively supported in Java, potentially requiring additional effort to ensure correct operation (see java-sample-app)
- Minimal customization requirements: If you are satisfied with the default scanning experience provided by the BlinkID SDK and only require basic UI modifications (such as colors and strings), integrating via the activity is the simplest approach
CameraX is a core component of the BlinkID SDK, and its behavior during configuration changes is important to consider. By default, CameraX reinitializes the camera when certain system events occur (such as device rotation or screen size changes), which can cause the camera preview to temporarily display a black screen. This effect is more pronounced on older devices due to slower camera operations.
When using the BlinkIdScanActivity integration method, the SDK addresses this by specifying the android:configChanges="screenSize|smallestScreenSize|orientation|screenLayout" attribute for the BlinkIdScanActivity in the AndroidManifest.xml. This prevents the activity from being recreated during these configuration changes, resulting in a seamless scanning experience.
When using the BlinkIdCameraScanningScreen composable, device rotation triggers activity recreation, leading to a brief black screen as the camera is reinitialized. To avoid this, you can set the same android:configChanges attribute in your app's AndroidManifest.xml. If you prefer the activity to be recreated on rotation (e.g., to reload resources or UI), this step is optional. Either way, the SDK will work as intended. For more details, see official Android documentation.
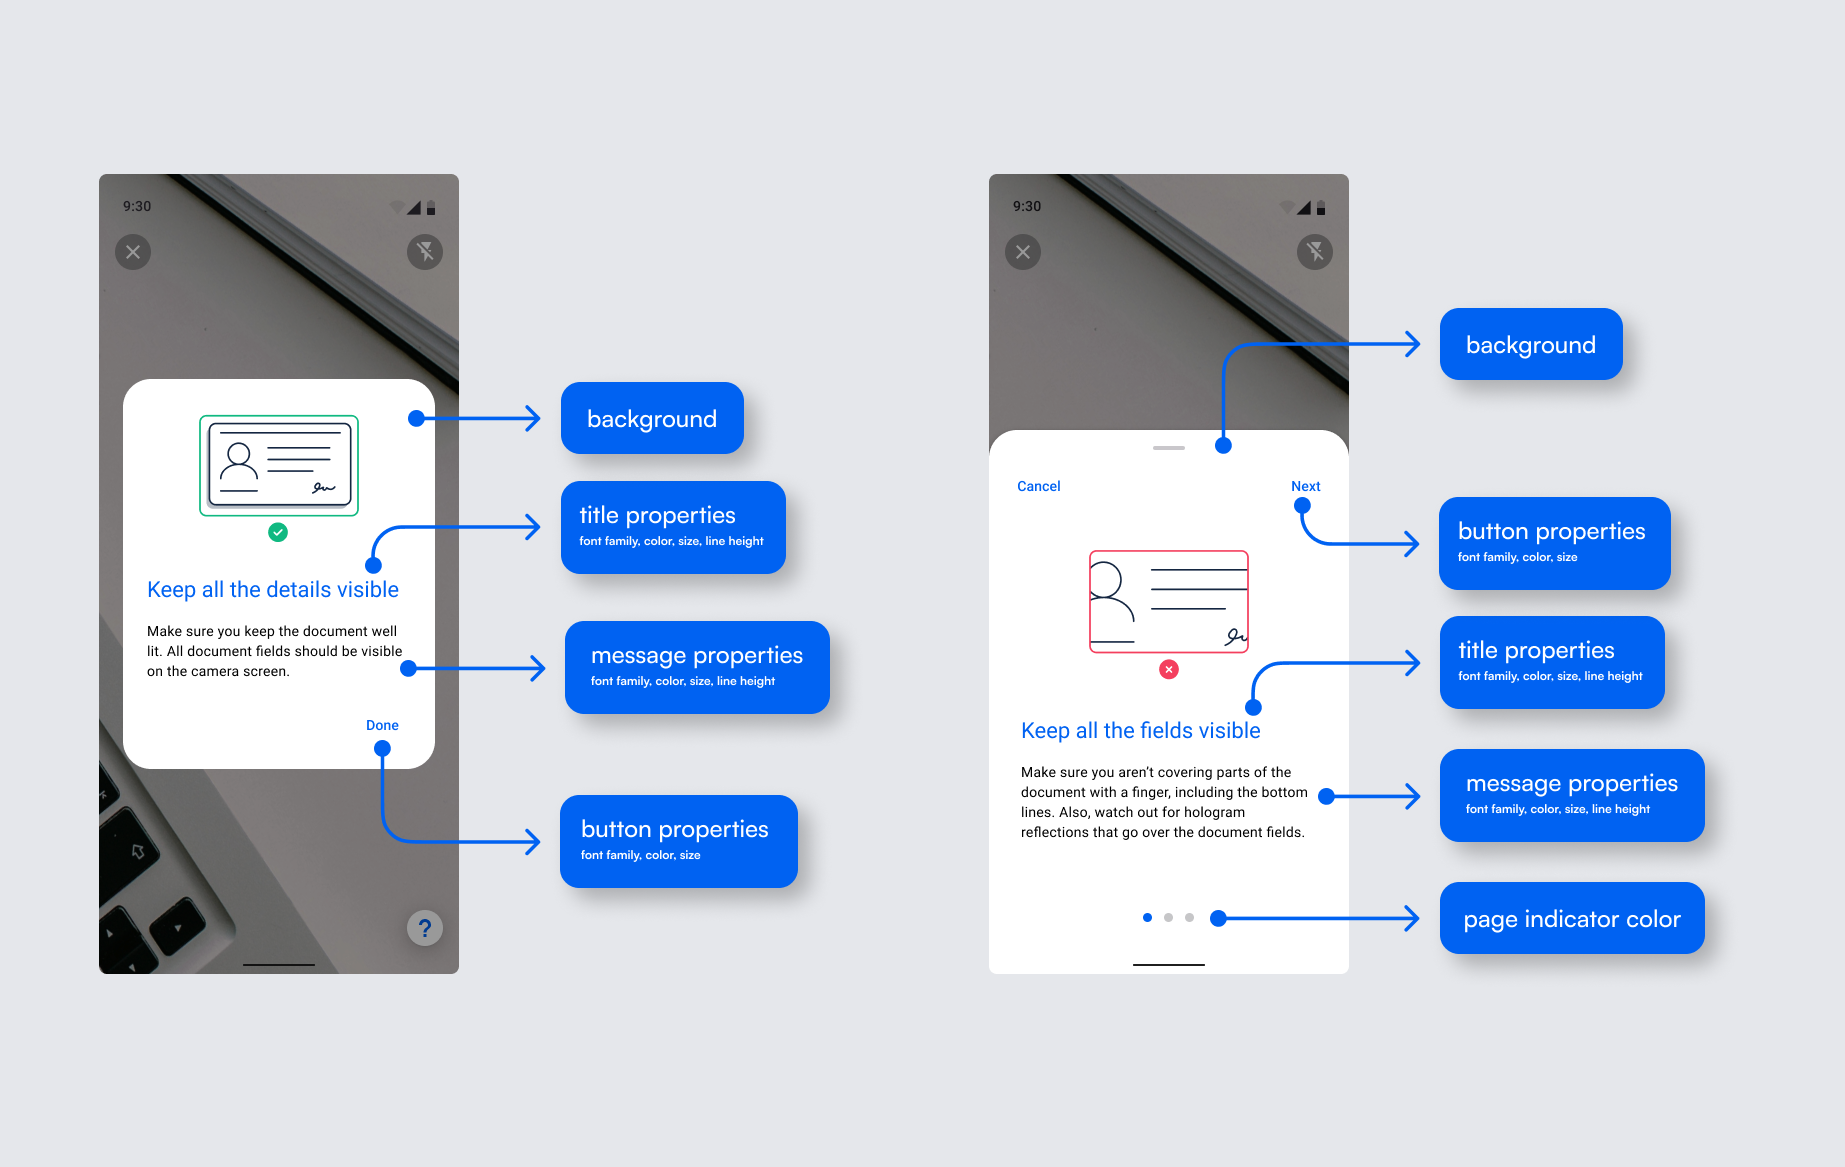
Almost every UI element can be easily modified in many different ways (color, size, font, background). This chapter provides basic guides regarding each implementation method.

You can use basic customization options in our default BlinkIdCameraScanningScreen composable:
BlinkIdCameraScanningScreen(
    blinkIdSdk = sdkInstance,
    /* UX settings options */
    uxSettings = BlinkIdUxSettings(
        stepTimeoutDuration = yourTimeoutDuration,
        allowHapticFeedback = true, // or false
        classFilter = null // all documents are accepted by default
    ),
    /* UI settings options */
    uiSettings = UiSettings(
        typography = yourTypography,
        colorScheme = yourColorScheme,
        uiColors = youReticleColors,
        sdkStrings = yourSdkStrings,
        showOnboardingDialog = true, // or false
        showHelpButton = true // or false
    ),
    cameraSettings = CameraSettings(
        lensFacing = CameraLensFacing.LensFacingBack, // or CameraLensFacing.LensFacingFront
        desiredResolution = Resolution.Resolution2160p // range between 720p and 4320p
    ),
    sessionSettings = BlinkIdSessionSettings(),
    onScanningSuccess = { scanningResult ->
        // result is BlinkIdScanningResult
    },
    onScanningCanceled = {
        // user canceled the scanning
    }
)
For a complete reference on available customization options, see UiSettings API docs.
It is possible to use completely custom UI elements by implementing your own Composable.
Create your implementation of scanning ViewModel (which must be a subclass of our CameraViewModel) to handle UX events that come from our SDK:
class YourBlinkIdScanningUxViewModel(
    blinkIdSdkInstance: BlinkIdSdk,
    sessionSettings: ScanningSessionSettings,
    uxSettings: BlinkIdUxSettings
) : CameraViewModel() {

    val imageAnalyzer = BlinkIdAnalyzer(
        blinkIdSdk = blinkIdSdkInstance,
        sessionSettings = sessionSettings,
        uxSettings = uxSettings,
        scanningDoneHandler = object : BlinkIdScanningDoneHandler {
            override fun onScanningFinished(result: BlinkIdScanningResult) {
                // TODO use scanning result
            }

            override fun onScanningCancelled() {
                // user cancelled the scanning
            }

            override fun onError(error: ErrorReason) {
                // handle scanning errors
            }
        },
        uxEventHandler = object : ScanningUxEventHandler {
            override fun onUxEvents(events: List<ScanningUxEvent>) {
                // handle scanning UX events to update UI state
                for (event in events) {
                    when (event) {
                        is ScanningUxEvent.ScanningDone -> {
                            // TODO
                        }

                        is ScanningUxEvent.DocumentNotFound -> {
                            // TODO
                        }

                        is ScanningUxEvent.DocumentNotFullyVisible -> {
                            // TODO
                        }

                        is ScanningUxEvent.DocumentTooClose -> {
                            // TODO
                        }

                        is BlinkIdDocumentLocatedLocation -> {
                            // TODO
                        }

                        is DocumentImageAnalysisResult -> {
                            // TODO
                        }

                        // TODO ... handle other events, when must be exhaustive, omitted for brevity

                    }
                }
            }
        }
    )

    override fun analyzeImage(image: ImageProxy) {
        // image has to be closed after processing
        image.use {
            imageAnalyzer?.analyze(it)
        }
    }

     override fun onCleared() {
        super.onCleared()
        // cancel and close image analyzer when view model is cleared
        imageAnalyzer.cancel()
        imageAnalyzer.close()
    }
}
Implement your camera scanning screen Composable by using our CameraScreen Composable which is responsible for camera management:
@Composable
fun YourCameraScanningScreen(
    viewModel: YourBlinkIdScanningUxViewModel
    //... other required parameters for your UI
) {
    // ...
    CameraScreen(
        cameraViewModel = viewModel,
    ) {
        // TODO your camera overlay Compose content
    }

}
Customizing pre-made SDK scanning activity is somewhat limited compared to customizing a composable but still offers many customization options. Custom colors, fonts, and text styles are provided through BlinkIdScanActivitySettings class.
data class BlinkIdScanActivitySettings(
  val sdkSettings: BlinkIdSdkSettings,
  val cameraSettings: CameraSettings = CameraSettings(),
  val scanningSessionSettings: BlinkIdSessionSettings = BlinkIdSessionSettings(),
  val uxSettings: BlinkIdUxSettings = BlinkIdUxSettings(),
  val scanActivityUiColors: BlinkIdScanActivityColors? = null,
  val scanActivityUiStrings: SdkStrings = SdkStrings.Default,
  val scanActivityTypography: ParcelableUiTypography = ParcelableUiTypography.Default(null),
  val showOnboardingDialog: Boolean = DefaultShowOnboardingDialog,
  val showHelpButton: Boolean = DefaultShowHelpButton,
  val enableEdgeToEdge: Boolean = true,
  val deleteCachedAssetsAfterUse: Boolean = false
)
Variable scanActivityUiColors of type BlinkIdScanActivityColors defines UI colors during the scanning session.
Variable scanActivityUiStrings of type SdkStrings allows for Strings customizations and adjustment of default translations.
Finally, through scanActivityTypography of type ParcelableUiTypography, you can define different fonts and text styles for every text object found in the scanning screen. Due to limitations of the native Typography class, we created a custom solution that enables all important text customizations.
For larger control over the UX, you can use the open-source blinkid-ux and microblink-ux libraries and perform certain modifications. Only the source files that specifically allow for modification by the license header can be modified.
To do so, you can include the source code of our library directly in your application.
They are located in libs/sources/blinkid-ux and libs/sources/microblink-ux modules.
Please keep in mind that we will regularly make changes and update the source code with each release.
Strings used within built-in activities and UX can be localized to any language.
We have already prepared strings for several languages which you can use out of the box. You can also modify those strings, or you can add your own language. Languages natively supported by our SDK are the following: Arabic, Chinese simplified, Chinese traditional, Croatian, Czech, Dutch, Filipino, French, German, Hebrew, Hungarian, Indonesian, Italian, Malay, Portugese, Romanian, Serbian, Slovak, Slovenian, Spanish, Thai, and Vietnamese.
In version v7.6 we've added 33 new languages or variations of languages: Danish, English (U.K.), Finnish, Greek, Icelandic, Latvian, Norwegian, Polish, Swedish, Turkish, Ukrainian, Russian, Japanese, Korean, Hindi, Urdu, Bengali, Farsi, Swahili, Amharic, Hausa, Yoruba, Nepali, Kazakh, Uzbek, Pashto, Sinhala, Georgian, Khmer, Akan (Twi, Fante), Mexican Spanish, Brazilian Portuguese, and Canadian French.
The language is automatically adapted to the user's OS language settings. Additionally, to force a specific language, you have to enable it from the code.
When implementing a language picker within the app it is recommended to use the official Android OS app-specific language picker. For customized language picker, please consult official Android documentation.
BlinkID can easily be translated to other languages. The res folder in microblink-ux has folder values which contains strings_core.xml - this file contains english strings. In order to make e.g. croatian translation, create a folder values-hr in your project and put the copy of strings_core.xml inside it. Then, open that file and translate the strings from English into Croatian.
To modify an existing string, the best approach would be to:
- Choose a language you want to modify. For example Croatian ('hr').
- Find
strings_core.xmlin folderres/values-hr - Choose a string key which you want to change. For example:
<string name="mb_close">Close</string> - In your project create a file
strings_core.xmlin the folderres/values-hr, if it doesn't already exist - Create an entry in the file with the value for the string which you want. For example:
<string name="mb_back">Zatvori</string> - Repeat for all the string you wish to change
You can modify strings and add another language. For more information on how localization works in Android, check out the official Android documentation.
You can define string resources that will be used instead of predefined ones by using the custom SdkStrings while creating the UiSettings.
The simplest way of using BlinkID SDK is through our integrated activity. This eliminates the need for Compose integration and allows for quick and easy access to results. By using this integration method customization is reduced, although most UI elements can still be customized.
Activity is accessed through rememberLauncherForActivityResult by using MbBlinkIdScan contract.
val blinkIdLauncher = rememberLauncherForActivityResult(
  contract = MbBlinkIdScan(),
  onResult = { activityResult ->
      if (activityResult.status == BlinkIdScanActivityResultStatus.DocumentScanned) {
      // use activityResult.result (BlinkIdScanningResult)
      }
  }
)
When launching the contract, BlinkIdScanActivitySettings need to be defined. These settings include basic SDK information such as license key and additional settings for customizing the scanning experience.
blinkIdLauncher.launch(
  BlinkIdScanActivitySettings(
    sdkSettings = BlinkIdSdkSettings(
      licenseKey = <your_license_key>
    ),
    scanningSessionSettings = BlinkIdSessionSettings(
      scanningSettings = ScanningSettings(
      // define additional settings here
      )
    )
  )
)
BlinkIdScanActivitySettings contain the following:
data class BlinkIdScanActivitySettings(
  val sdkSettings: BlinkIdSdkSettings,
  val cameraSettings: CameraSettings = CameraSettings(),
  val scanningSessionSettings: BlinkIdSessionSettings = BlinkIdSessionSettings(),
  val uxSettings: BlinkIdUxSettings = BlinkIdUxSettings(),
  val scanActivityUiColors: BlinkIdScanActivityColors? = null,
  val scanActivityUiStrings: SdkStrings = SdkStrings.Default,
  val scanActivityTypography: ParcelableUiTypography = ParcelableUiTypography.Default(null),
  val showOnboardingDialog: Boolean = DefaultShowOnboardingDialog,
  val showHelpButton: Boolean = DefaultShowHelpButton,
  val enableEdgeToEdge: Boolean = true,
  val deleteCachedAssetsAfterUse: Boolean = false
)
Most customizations regarding the UI are handled in the same way as with the Composable component.
The main difference can be found in how Typography is set.
Customizing SDK Typography is still available through scanctivityTypography which is ParcelableUiTypography type. This class offers only the most important TextStyle and Font parameters.
While Colors are fully customizable, the client needs to make sure that Dark and Light themes follow the current system state. In the Compose implementation, this is handled directly by the SDK.
When using the low-level API, you are responsible for preparing the input image stream (or static images) for analysis as well as building a completely custom UX from scratch based on the image-by-image feedback from the SDK.
Low-level API gives you more flexibility with the cost of a significantly larger integration effort. For example, if you need a camera, you will be responsible for camera management and displaying real-time user guidance.
For low-level API integration, only BlinkID SDK core library: blinkid-core is needed.
Both blinkid-ux and microblink-ux are not needed.
In your project root, add mavenCentral() repository to the repositories list, if not already present:
repositories {
    // ... other repositories
    mavenCentral()
}
Add blinkid-core library as a dependency in module level build.gradle(.kts):
dependencies {
    implementation("com.microblink:blinkid-core:7.6.1")
}
BlinkIdSdk is a singleton that is main entry point to the BlinkID SDK. It manages the global state of the SDK. This involves managing the main processing, unlocking the SDK, ensuring that licence check is up-to-date, downloading resources, and performing all necessary synchronization for the processing operations.
Once you obtain an instance of the BlinkIdSdk class after the SDK initialization is completed, you can use it to start a document capture session.
BlinkIdScanningSession is the main object that accepts images and camera frames, processes them and returns frame-by-frame results, and final result when it becomes available.
- First initialize the SDK to obtain
BlinkIdSdkinstance by callingBlinkIdSdk.initializeSdksuspend function from a Coroutine:
val maybeInstance = BlinkIdSdk.initializeSdk(
    context,
    BlinkIdSdkSettings(
        licenseKey = "your_license_key",
    )
)
when {
    maybeInstance.isSuccess -> {
        val sdkInstance = maybeInstance.getOrNull()
        // use the SDK instance
    }

    maybeInstance.isFailure -> {
        val exception = maybeInstance.exceptionOrNull()
        Log.e(TAG, "Initialization failed", exception)
    }
}- Create
BlinkIdScanningSessionby calling suspend functionBlinkIdSdk.createScanningSession(BlinkIdSessionSettings)
val scanningSession = blinkIdSdk.createScanningSession(BlinkIdSessionSettings(
    // use InputImageSource.Video to analyze stream of images, if you have few
    // images (e.g. from gallery) use InputImageSource.Photo
    inputImageSource = InputImageSource.Video,
    // update other options if required
))- To process each image (camera frame) that comes to the recognition, call the suspend function
BlinkIdScanningSession.process(InputImage): BlinkIdProcessResult
val processResult = scanningSesionSession.process(inputImage)There are helper methods for creating InputImage from android.media.Image, androidx.camera.core.ImageProxy and standard Android Bitmap.
Processing of the single frame returns ProcessResult which contains:
- Detailed analysis of the input image, including various detection statuses and potential issues that should be used for frame-by-frame UX updates.
- Completeness status of the overall process.
You should keep calling the process function until the result completeness indicates that the result is complete, but you could have custom logic for cancellation and timeouts.
If after analysis of some image completeness status of BlinkIdProcessResult indicates that document capture is complete, only then you should get the final result from the ScanningSession:
if (processResult.resultCompleteness.isComplete()) {
    val captureResult = session.getResult()
    // do something with the final result
}
You will get BlinkIdScanningResult with extraction results.
After scanning is completed, it is important to terminate the scanning session
To terminate the scanning session, ensure that BlinkIdScanningSession.close() is called.
If you are finished with the SDK processing, terminate the SDK to free up resources by invoking BlinkIdSdk.closeAndDeleteCachedAssets() on the SDK instance. If you just wish to close the SDK but may need to use it and the future, you can eliminate the need for re-downloading the resources by calling BlinkId.close().
Even though BlinkID v7 and above uses modern Android Jetpack components like Compose and coroutines, most functionalities still work with legacy code. It is important to note that even without using Jetpack Compose, it is highly recommended to use Kotlin when implementing the SDK, as it not only eases the implementation process, but also allows for some new functionalities.
If the client insists on using only Java (and Android Views), BlinkID functionalities can be used through BlinkIdScanActivity.
A simple implementation like the following should suffice:
ActivityResultLauncher<BlinkIdScanActivitySettings> resultLauncher = registerForActivityResult(
        new MbBlinkIdScan(),
        result -> {
          // handle result here
        }
);
When launching the contract, BlinkIdScanActivitySettings need to be defined. These settings include basic SDK information such as license key and additional settings for customizing the scanning experience.
String licenseKey = "your_license_key";
BlinkIdSdkSettings sdkSettings = new BlinkIdSdkSettings(licenseKey);
BlinkIdScanActivitySettings activitySettings = new BlinkIdScanActivitySettings(sdkSettings);

resultLauncher.launch(activitySettings);
A java-sample-app can be found in the sample app list where the SDK is implemented using Java and Android Views. Additional helper functions have been created to simplify the implementation process with default class values from Kotlin.
For more information on how to use BlinkIdScanActivity, please refer to the Using SDK through BlinkIdScanActivity section.
Currently, this is the only officially supported way of using our SDK with Java and without Kotlin/Jetpack Compose.
In case of problems with SDK integration, make sure that you have followed integration instructions and device requirements. If you're still having problems, please contact us at help.microblink.com describing your problem and provide the following information:
- high-resolution scan/photo of the item that you are trying to read
- information about device that you are using - we need the exact model name of the device. You can obtain that information with any app like this one
- please stress that you are reporting a problem related to the Android version of BlinkID SDK
We recommend that you distribute your app using App Bundle. This will defer APK generation to Google Play, allowing it to generate minimal APK for each specific device that downloads your app, including only required processor architecture support.
Here is the SDK size, calculated for supported ABIs:
| ABI | Download size | Install size |
|---|---|---|
| armeabi-v7a | 3.42 MB | 4.57 MB |
| arm64-v8a | 3.48 MB | 5.27 MB |
SDK size is calculated as application size increases when BlinkID SDK is added, with all its dependencies included.
You can find the BlinkID SDK KDoc documentation here.
For any other questions, feel free to contact us at help.microblink.com.